Showing posts with label Cane Work. Show all posts

Friday, June 24, 2011

Mostly Purple Polymer Clay

Our farmer's market is on the square this year, very convenient for us as we live less than half a block from the square. It's every thursday from 4:00 PM until 8:00 PM...the day and time is a little strange but it works for me. I cannot tell you how wonderful it is to have fresh homegrown vine ripened delicious tomatoes... so yummy!!  I didn't want to appear greedy, they only had two beer flats full so I controlled myself and  bought 4 big ones.... we came home, I sliced one, we gobbled it down and then consumed a second...  to heck with the greed,  I send hubby back for more.  I  also purchased 3 zucchini, a container of blackberries, a loaf of homemade cinnamon raisin bread, a dozen homemade donuts, a couple caramel brownies and a couple cherry crumble thingies.   The lady who makes pepper jelly wasn't there  and I didn't find any apple butter... maybe next week..  That is the day I have eye surgery but it's in the morning so maybe by afternoon I can still make the farmer's market.

My muse was in a purple mood this week,  Here's what I made

Click on the photos for a closer look.

Mixed media pendant, the frame is woven colored wire and beads.  The bird silhouette is on purple clay, sealed with Kato liquid.  The Swaroski rhinestone catches the light for a bit of sparkle.


I had purple clay left over from my mixed media purple cats so I made these.  The swan silhouette is sealed with a thin layer of liquid Kato.


I am still mixing Pardo Art Clay with Kato pearl, I love the shine it has when sanded and buffed. The pendant on the left is made from left over scraps from the one on the right.


These were made from a small kali cane of purple and yellow. I used the end piece from the cane on the middle tile.  I added Swarovski rhinestones for a little glitz.  Did you know you can sand rhinestones? It smooths off the points and gives them an opal-like look like the ones in the centers of the square tiles.... just make sure they are firmly embedded in the clay.  


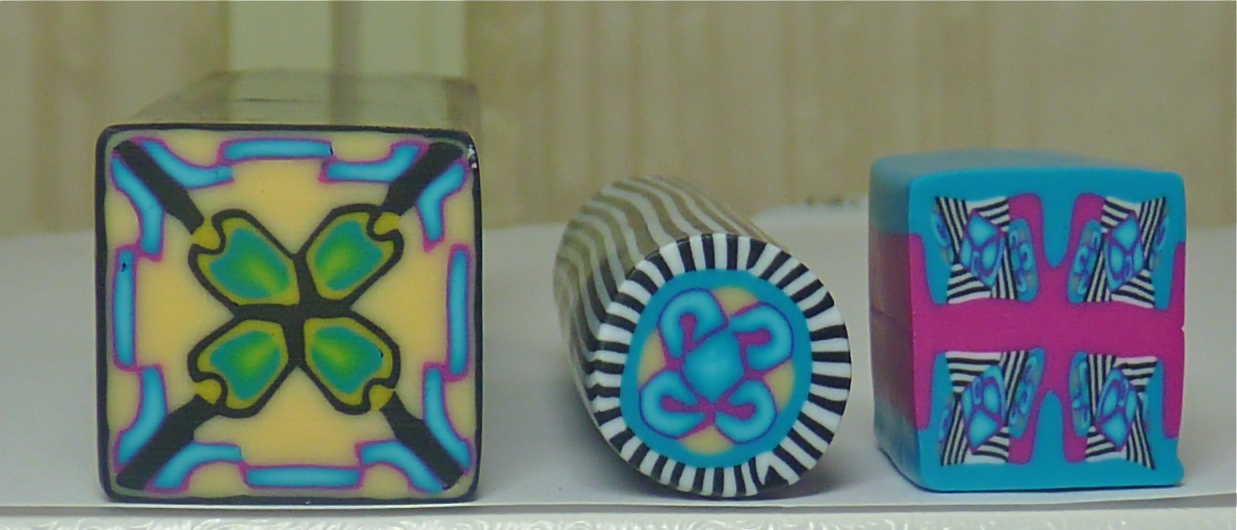
Mostly blue with purple accents, made from solid colors and striped canes. I like to cut shapes and assemble them in layers.


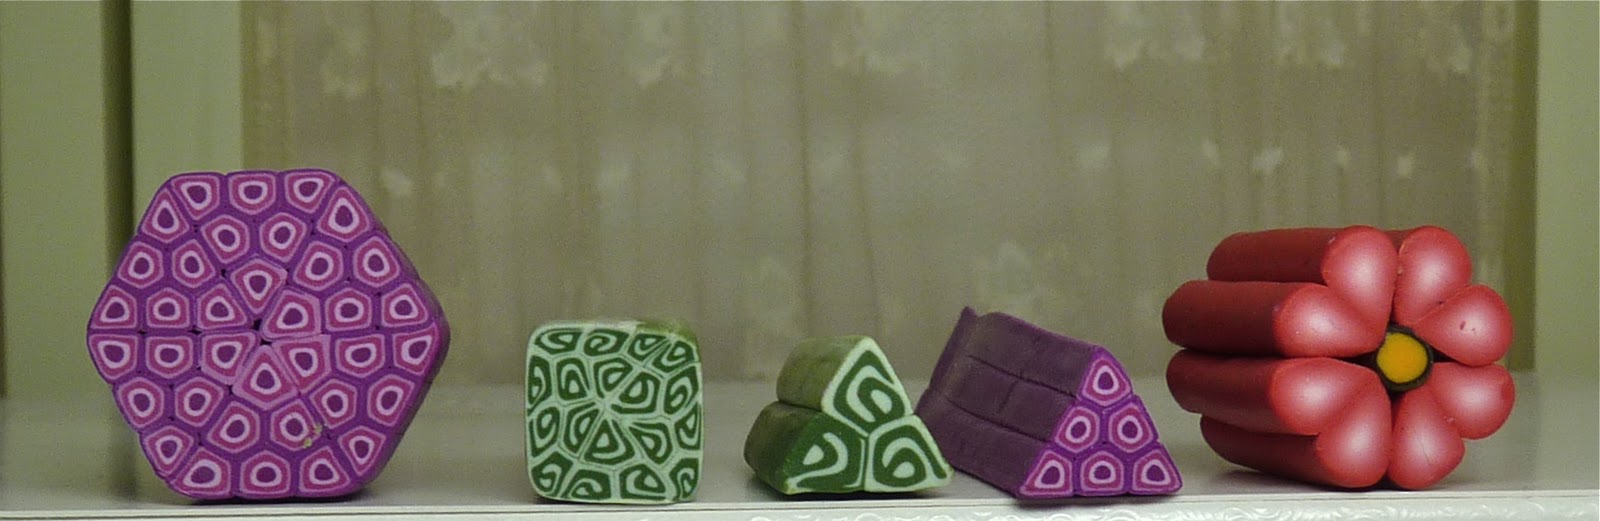
and just for fun, mirror image cabochons from Jackie cane ends.  Don't you think these would be pretty beaded or wrapped with wire? 


I'm thinking green for tomorrow, Thanks for looking. 

Sunday, February 13, 2011

Polymer Clay Extruded Canes

I have been working on Thing a Day items for the last 13 days. My work table was covered with scraps of clay. I made piles of clay in different color groups ran them through the pasta machine and made clay sheets of rather weird colors.   I decided do a little experimenting.

I spent the afternoon playing with my extruder..... now my thumb is sore.  Did you know if you put a corkscrew cane in the extruder you get little corkscrew canes? I did not know that so I was pleasantly surprised.  Reminds me of chocolate and marshmallow.... yum!

Same thing happened when I extruded a bullseye cane.... little bullseye canes


 Same with Skinner blends... I added a border but the center is Skinner blend.


Then I got a little more creative. I made a striped cane, sliced off a piece, pinched the sides together and rolled it into a log, stuck it in the extruder and out cane smaller versions of the big one. 

Next I made a cane of different color logs, rolled it smooth and out came little canes just like the big one. 


Then I made another striped cane, cut a log, reduced it a bit, twisted it like this:


I rolled the twisted log smooth and loaded it into the extruder


and out came this interesting design.  I saw something similar  from another polymer clay artist... but I can't remember where, anyone know? ...  I think they used logs that they twisted instead of stripes. Might have been on Polymer Clay Central or Flickr.  


Please keep in mind the colors are from scrap clay, some are kinda... yucky.  I wanted to see what would happened before I opened new packages of clay.  If a small canes is desired it sure beats reducing the usual way, it's fast and the canes are uniform in size. 

Here are a few other canes I made with my extruder. I used the teardrop shaped disc for the Skinner blend petals on the pink flower.

Next I want to see what will happen if I  extrude a flower cane or a kaleidoscope cane.  


Like I said, I'm sure this has been done before but it was new to me. Hope you find it helpful as well. 

Wednesday, January 26, 2011

Polymer Clay Striped Cane and Jewelry

I like stripes, all kinds of stripes, different widths, different colors. I like to combine them with other shapes.

  I am going to concentrate on stripes for the next few days and see what I come up with. Here are my frist stripe canes.

Click on the photos for a closer look.

I made a multicolor stripe cane and used it to make the abstract cane.


plus a couple more variations 


I made this pendant from the end scraps, added a few little flowers and filled the opening in the center with  colored wire and crystal beads. 


More pendants, the one on the top right is from end scraps. I made the design on the other two by cutting a log off the stripe cane twisting it, rolling it smooth and cutting length wire.  I liked the little flowers on the first one so I scatterer them across these too. 


I made beads to use with the pendants but they are in the oven.  I'll show them to you later. 

Thanks for stopping by. 

Tuesday, October 12, 2010

Pardo Art Clay Canes & Pendants

I was so happy to get my white Art Clay I spent the weekend making canes. I started out with a nice assortment of Skinner blends and striped canes. 

Click on the photos for a closer look.


Then I made some Kaleidoscope Canes. I've said it before but it's worth repeating, this clay reduces so well, very little distortion as you can see. 


More canes, I like the yellow one best but my favorite is rarely the favorite of others. 


I used the scrap ends of one of the above canes to make this pendant and then added colored wire and fringe beads.  I think I will add either a raven or an owl on the pendant, I'll post a photo when I decided which to use.


 Another pendant from the end of the blue cane.   I used silvertone wire to make the bail.

I am still making canes... and will need more white clay soon. 

By the way I haven't had any further problems condition the art clay.  I opened a couple new packs of black and it conditioned with ease. Apparently just the one pack was bad.  

Wednesday, October 6, 2010

Polymer Clay Canes & Things

While waiting for my order of white Pardo Art Clay to arrive I made a few canes using a variety of colors. I got the colors for this one by adding a little brown to orange,  a touch of black to yellow to get the lime and a touch of brown to yellow for the mustard yellow.  

Click on the photos for a closer look. 


Until now I've found the Art Clay very easy to condition however I ran into a problem with the black clay. I opened a new package of black clay, cut slices a little wider than the #1 setting on the pasta machine.  When I ran it through the PM it was very crumbly and got more crumbly each time I put it though the PM.  I then put it in a plastic sandwich bag and tucked it in my bra to warm it up.  The warming up helped but the rollers on the PM were cold.... my craft room was a little chilly ( I'm being stubborn about turning on the furnace)  and once the clay cooled off it was crumbly again... weird huh? I finally coated it with a little Kato liquid clay, let it sit overnight, and tried again. Much better but still a little crumbly.  When I conditioned the rest of the block of black clay I added a slice of translucent and that made a big difference. Now I'm wondering about the shelf life of this clay or if it may have been partially cured in the mail.  I would love to know if anyone else has had any problems conditioning the Art Clay and if so, how you solved the problem. 

This is a pendant I made with the cane ends.  


For this cane I tinted translucent Art Clay with alcohol inks.  The cane is cool looking but when I baked a couple tiles the colors didn't show up very well, they were way to dark.... I forgot to take a photo of the dark tiles.


I cut a couple thick slices of the cane and ran it though the PM to the #6 setting to make the tiles for the earrings. Since they are thinner and the the pattern is bigger the colors are more pronounced.  For the pendant I backed the cane slices withe crackled silver leaf over black clay. 


This is how the earrings look with light behind them.

I got the colors for the  stripped cane by mixing left over clay from the other canes and then outlining in black.  The colors for the cane on the left are mixes of blue, magenta and violet added to beige.


These pieces are made with the cane ends and left over pieces from the striped cane.


I still had small amounts of the translucent clay that I tinted with the Pardo Metal paints. I made a small cane and used it to make these.  I like the shimmery shine.

I am very happy to announce my white clay has arrived... amazing how hard it is to work without white. 

Thursday, September 23, 2010

More Pardo Experiments

I am almost out of the Pardo Art Clay that I purchased at Hobby Lobby so I placed an order with Poly Clay Play and am now anxiously awaiting it's arrival. Unfortunately her supplier is out of white so the white I ordered is on back order..... hard to do much without white but I will do my best.  


As you can see the translucent that I tinted with the Pardo Green Metal Paint is no long translucent but it is a pretty pearly green. I put it though the pasta machine to the thinnest setting (#9). I wanted to see how stamping with ink would work on the clay. The larger one I stamped before curing and the smaller one with the bird I stamped after curing and then put back in the oven for 10 minutes to heat set the ink.  The one I stamped prior to curing shows up the best.  

Click on the photos for a closer look. 


And I did have success making swirlies with the art clay.... although I did have to swirl twice as long as with Kato or Fimo Classic.  

I made a couple more canes. My flowers are always a little goofy looking but as you can see the art clay holds up well to reduction.  I like the funky cane I made in black and white. 


And here are a couple pendants I made with the canes. I was going to remove the eyelet before I sanded but couldn't get it to pop out so I sanded over it.  On the first one I used silver PearlEx on the top and lower edges and sealed with a thin layer of Kato liquid clay.  I wanted to see how the Art Clay would hold up to the heat gun and it did pretty well. It did start to bubble a bit on the blue striped area on the left side so I stopped as soon as I saw the bubbles forming and was able to sand them off.  I sanded and buffed both pieces and I got a better shine on the one where I used the heat gun.


Hope you found the information helpful. Please feel free to ask questions. If you have been working with art clay I would love to see what you've done with it. 

Tuesday, September 21, 2010

Pardo Art Clay Necklace

I made this necklace to test the strength of Pardo Art Clay. I cut very thin slices from the previous Pardo cane and rolled two corners to the center to form the beads. I used a pin vise to make small holes in the other two corners for the O rings.  To make the pendant I cut a thicker slice from the cane, ran it through the pasta machine to the #9 setting and then rolled it into a cone.  

Click on the photos for a closer look. 


I used faceted crystal beads, copper bead caps and brown wire to make complimentary links to go with the curled cane beads. 


Close up of the curled beads.  


The pendant is filled with a crystal bead and brown wire with a lacy bell shaped bead cap on the top.


View of the back of the beads. 


The clay held up really well, no tearing or breaking. 

I have more pieces almost finished, just have to do a little sanding and buffing. I will show you tomorrow.  


Friday, September 17, 2010

More Pardo Art Clay

Here is another cane with Pardo Professional Art Clay. This time I tinted some translucent with alcohol ink (the yellow portion of the cane) and used it for the background. This is the cane before reduction. 

Click on the photos for a closer look


This is the cane after reduction, as you can see, very little distortion. It is very easy to reduce and I didn't have to let it rest before reducing like I do the other brands.  The other two are mini canes from scraps.  


 The canes slice neatly and the slices hold their shape. I do quarter turns after each slice to keep them as square as possible. The background is gold leaf over green clay. My photographic skills are limited so I wasn't able to show the depth the translucent creates but I think you get the idea.


I sanded and buffed the pendant tile. I tried to pop the eyelets out before sanding but they wouldn't come out  so I sanded over them,  they look pretty good sanded. 


I haven't sanded and buffed the beads yet. I used thinner slices of cane on the beads so the gold leaf shows up better. 


I also tried tinting Pardo translucent with Viva Precious Metal paint.  I  condition the clay, divided a sheet of #1 thickness into 6 small pieces and then painted with the Viva paints. The first is pearl, 2nd is coral, 3rd is crimson, the 4th is emerald, the 5th is  gold and the last one is a mix of green and blue with a little gold that was left on the brush.  I let them sit until the paint was dry, about an hour.  By the way you can clean the brushes with soap and water. I think cleaning instructions should be on every kind of paint,  ink, or dye but of course it isn't..... one of my pet peeves. 


Here is how they look mixed in. As you can see I also added a piece that I'd made earlier with blue.  Once the gold was mixed it it turned a yucky gray.


I rolled out the colors to the #9 setting on the pasta machine and placed them over clay with different designs. As you can see in this photo the paint takes away most of the translucent effect. The pearl didn't mix in very well. I added glitter to the gold and the green.  Needless to say I didn't get the effect I was going for so I'll have to come up with a different use for the rest of the tinted clay.

When all else fails... make swirlies.  I'll try that tomorrow. 

Thanks for stopping by, if you have any questions or comments I'd love hearing from you. 

Thursday, September 9, 2010

More Pardo Clay Projects


I went back to Hobby Lobby and purchased one of every color they had plus two whites and two translucent.  And as you can see, I purchased some of the paints too. 


Click on the photos for a closer look.

 I made these canes. The clay conditioned with ease and reduced wonderfully. So far I'm loving it.  Very little distortion and the canes are easy to slice.


 I used my extruder for this one, the one on the right is from left over clay.  The clay is expensive so I don't want to waste a single bit.


This was an experiment.  I rolled a sheet of translucent out to the #9 setting on my pasta machine. I laid it on a ceramic tile and painted some squiggles on the raw clay with the metal paints.  I cut the excess clay from around the images (again because of the cost I didn't want to waste clay) and popped it in the oven.


 The cured pieces are very strong and flexible. I tried bending it every which way and it didn't break.


Next I am going to try it with the colored clay and see what happens. If the thin sheets are strong enough I would like to use them with wire.  I have a plan in my head, now we will see if it works.